
Uploading Pictures

Uploading Pictures to your Computer.
How to preserve the original high quality images when uploading your digital pictures to your computer.
Most of us rely on Windows or the Mac OS to guide us when uploading our images to our computer. We often use resident programs to do the work such as Photoshop Elements and Picasa. These programs are NOT where the pictures are stored. They are used to view and edit images. The shortcoming of using these viewing and editing programs to upload you pictures, is these programs usually reduce the quality of the image making it difficult if not impossible to get a high quality print in the future. The following steps will bypass the program. After the images are loaded on to your computers hard drive, you access them using the same image viewing and editing program that you are accustomed to, such as I-photo and picasa. To access the images, open the program, click on file, scroll down to open, and open the photo. If you make changes, always save the file using a different name. This will maintain the integrity of the original in case you change your mind.
To create a destination folder where your pictures will permanently reside.
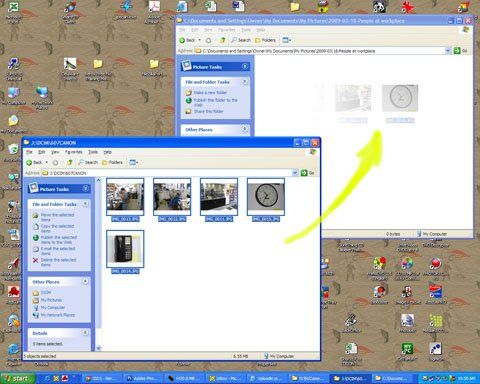
1 - Carefully drag the images from the camera window to it's destination folder that you created in steps 3 and 4.
2 - left click on a single image. Select all of the images by simultaneously hold the shift key and the letter A (SHFT-A) to select all of the images (they all turn blue).
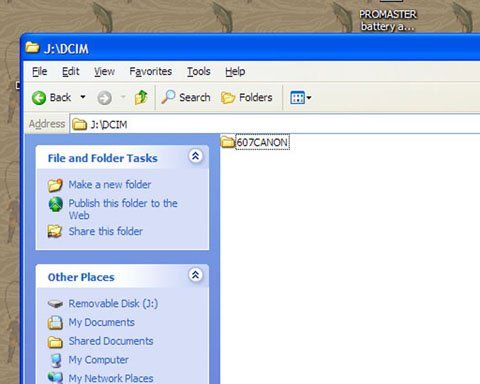
3 - A removable drive should show up in the list which indicates that the device is working. Dbl click on that drive letter. A new folder will show up. Usually the 1st folder is DCIM (Digital Camera IMages), followed by a second folder which is usually the camera brand. Dble click on the DCIM and all the images will show up.
4 - Dble click on MY COMPUTER
5 - Plug in you camera or insert your memory card into its reader. Turn the camera on. If the automatic windows program starts, close it by clicking on the X at the upper right of the window.
6 - Make the window smaller so you can have 2 windows visible at the same time.
7 - Name your new folder. I like to do the date and a description as I can always find my pictures when I need them (2009-03-17-Marks Birthday) If you keep the date in the YYYY-MM-DD format, everything will be chronological.
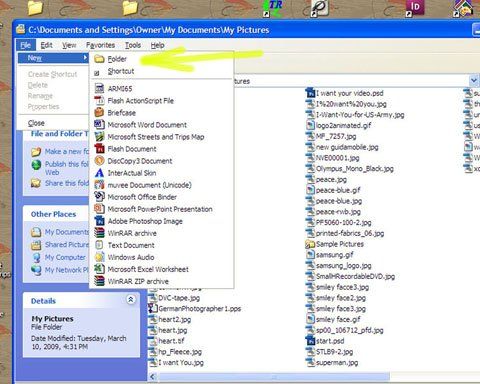
8 - Dbl click on MY DOCUMENTS
9 - Dbl click on MY PICTURES
10 - Click on FILE, drop down to NEW and move over and click on FOLDER.
You have successfully moved your pictures from the camera (source) to the computers hard drive (destination).
To edit and play with your pictures in Windows, open your program of choice, Picasa, Photo Shop Elements, Corel Paint, Paint Shop, etc. At the upper left, click on file and drop down to open and Navigate to MY PICTURES and open the new folder and click on the picture that you want to edit.
The MY PICTURES folder is C:\Documents and settings\ user (maybe your name) \ My Pictures.